


Your Complete Guide to Doll Eye Lash Mapping
Lash Mapping Style Guide: How to Create an Open Eye Effect with a Doll Eye Lash Map
It might be stating the obvious to say that the mapping you choose for your client makes a huge difference to the way their lashes look, but the lash mapping style you choose can actually change the way their entire face looks. Choose the wrong lash mapping style and you can make your client look permanently sad or startled, get it right though and they’ll turn heads anywhere they go!
Here’s your guide to a doll eye lash map, including some helpful tips and tricks to take your lash looks to the next level!
What is a Doll Eye Lash Map?
A Doll Eye lash map is one of the easiest maps to learn and to draw, because it’s so symmetrical. You may have also seen a doll eye map referred to as a dolly style, or an open eye lash map – like so many things in the eyelash extensions world, they’re all just different names for the same thing.
Who is a Doll Eye Lash Map Best For?
A doll eye lash map opens up the eyes, making it a great style for clients with almond eyes. Clients who have a wider set of eyes – ie. the space between their eyes is wider than the width of each eye – will benefit from having a doll eye lash style, as the shape of a doll eye gives the illusion of their eyes being closer together. That’s not to say that we’re trying to ‘correct’ anything in our client’s face, we’re simply trying to give them a lash look which accentuates their beauty and complements their unique features.
Who is a Doll Eye Lash Map NOT Ideal For?
Clients with round eyes would benefit more from a style such as Squirrel or a Cat Eye lash style, as a doll eye lash map will end up making them appear startled due to its eye opening effect. Also opposite to the previous point, clients who have a close set of eyes – ie. the space between their eyes is not as wide as the width of each eye – will find that a Doll Eye Lash Map will give the appearance of them having even less of a gap, so again, for these clients think about opting for a Squirrel or even a Cat Eye.
How To Map A Doll Eye Lash Style
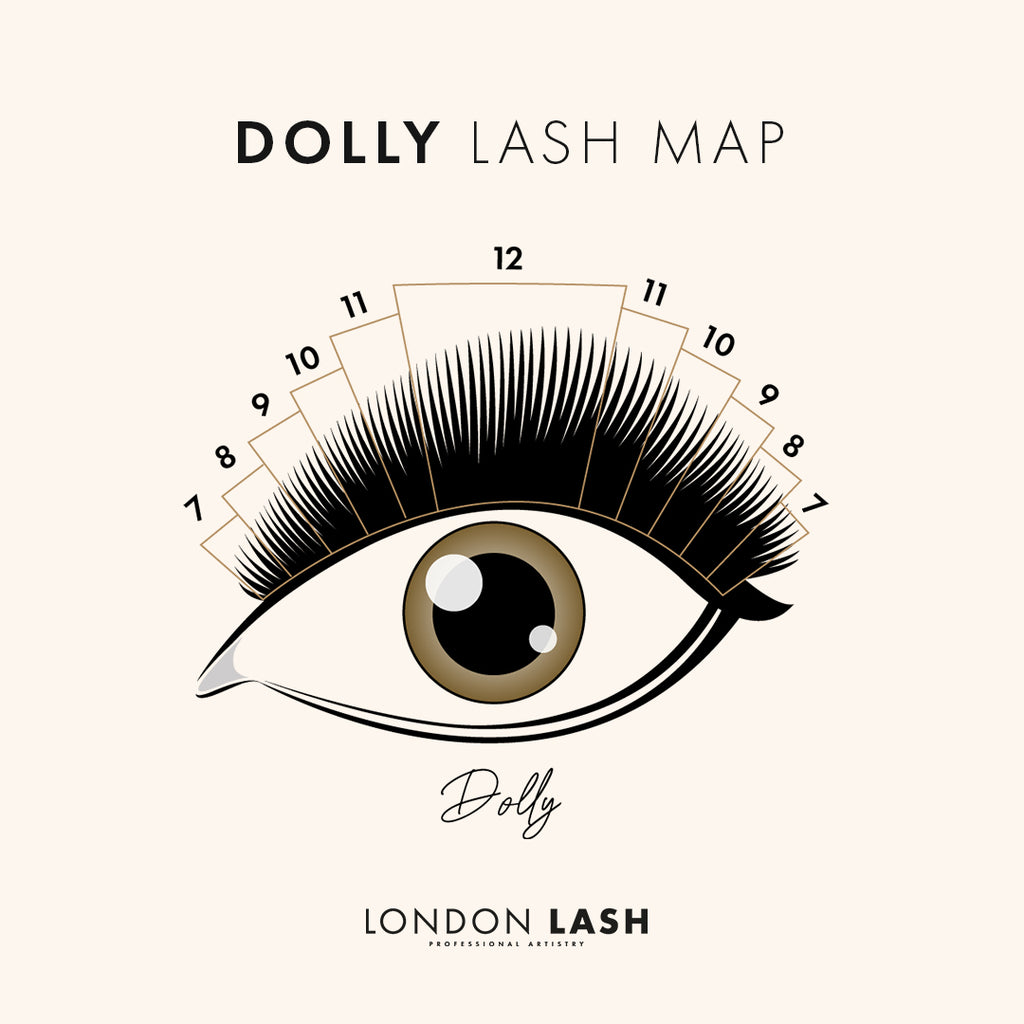
Mapping a doll eye is pretty easy, as lash maps go. The key is symmetry – anything you do on one side of your map should be mirrored on the other, and everything you do on one eye will be mirrored on the other eye.
Start by marking out the last lash and the first lash on your eyepatch, and then make a mark in the middle of the lash line.

Next, depending on whether you want more of a pointed arch or a very soft arc to your lash look, you’re going to mark the edges of your longest section. If you want a more pointed arch to open the eyes up a lot or to give the appearance that they’re even closer together, make the longest section narrower and use more lengths, gradually going down from your longest length to 8mm in the inner corners at most.

TOP TIP! Using short lash extensions in the inner and outer corners is important for maintaining the health of the natural lashes, and for giving your clients a really professional looking lash set. Natural lashes in the inner corner in particular tend to be shorter and finer than through the rest of the lash line. Using lash extensions that are too heavy on these finer lashes will weigh them down and can cause them to twist and/or fall out prematurely, sometimes leading to them growing back even weaker than before, or sometimes leading to them not growing back at all.
Back to mapping. Once you know how wide you’d like your middle section you’re just going to split the remaining segments evenly, mirroring whatever you do on either side of your middle section. Ideally, you’ll be using a minimum of 5 lengths in any given lash map to keep your sets looking really professional.

Which Lash Curls Should You Use With A Doll Eye Lash Map?
The best thing to do is check the way that your client’s natural lashes are growing and select your curls based on that. You can absolutely use the same curl throughout your lash set, but keep in mind that if your client’s lashes are growing upwards in some sections, straight in others and down in another, using the same curl throughout can cause an otherwise well thought out lash mapping style to give their eyes a sad or drooping look.
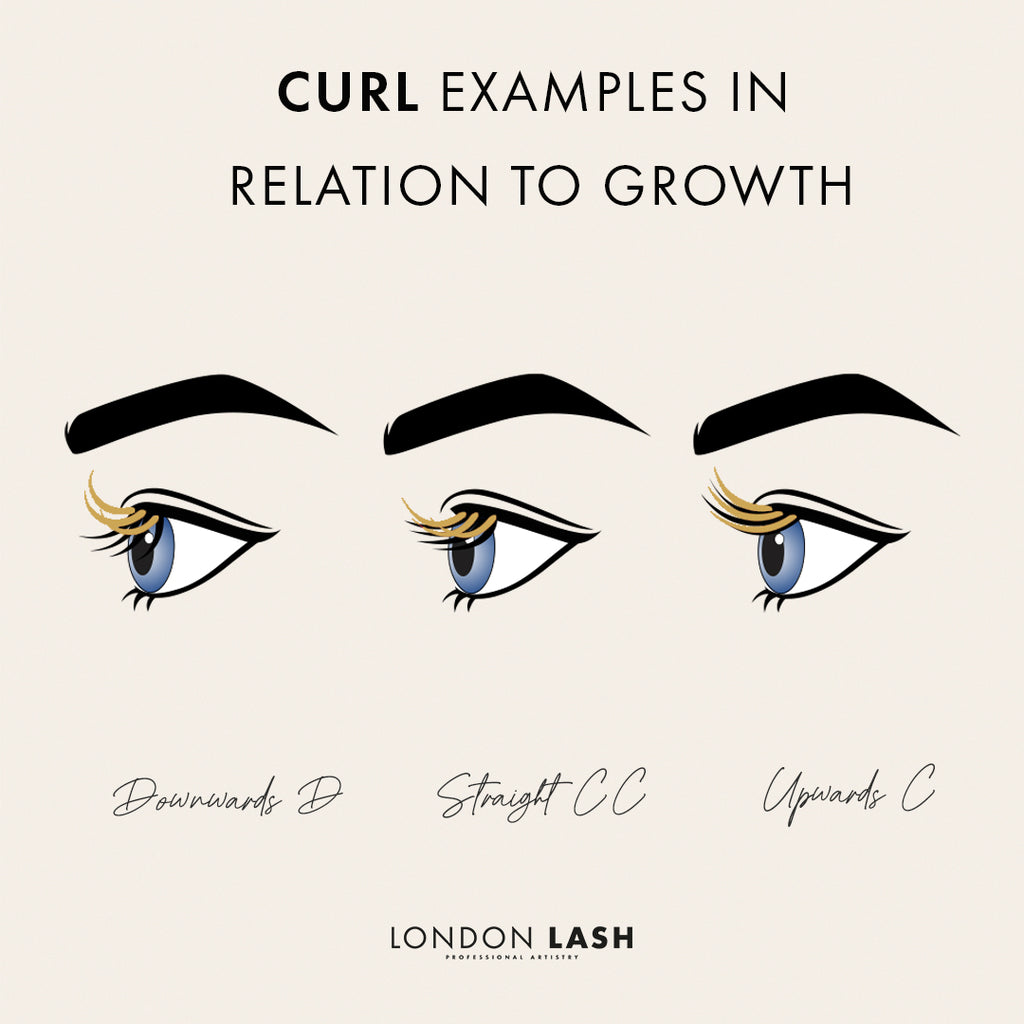
With a doll eye lash map, it’s best to use your classic C, CC and D curls, as M curl lashes and L curls can look a little strange in a doll eye, unless your client’s lashes are growing downwards and you need the extra lift.
We have an entire blog post dedicated to lash curls and when is best to use them, so be sure to check that out if lash curl selection is something you’d like a bit of extra help with.
Other Lash Mapping Style Tips to Consider
A doll eye is just the shape of your set. It’s the main thing you consider when you’re figuring out what's going to make your client look their best, but you should also think about the actual look they want. A doll eye lash map can be used as a base for pretty much any style you might see trending, from a manga lash set to a wet look, a set of classic lashes, a wispy hybrid set, or any kind of volume lash look you can think of!
An easy way to achieve a wispy top line is to use easy fan lashes which have a mixture of lengths on each strip so effortlessly create a wispy finish. If easy fans aren’t your thing though, you’ll be glad to know that simply by applying the same lash length to each layer in each section of your map, you’ll have a significantly more wispy top line than if you drop down a length for each layer you go up, which is what traditional Russian Volume technique says we should do.
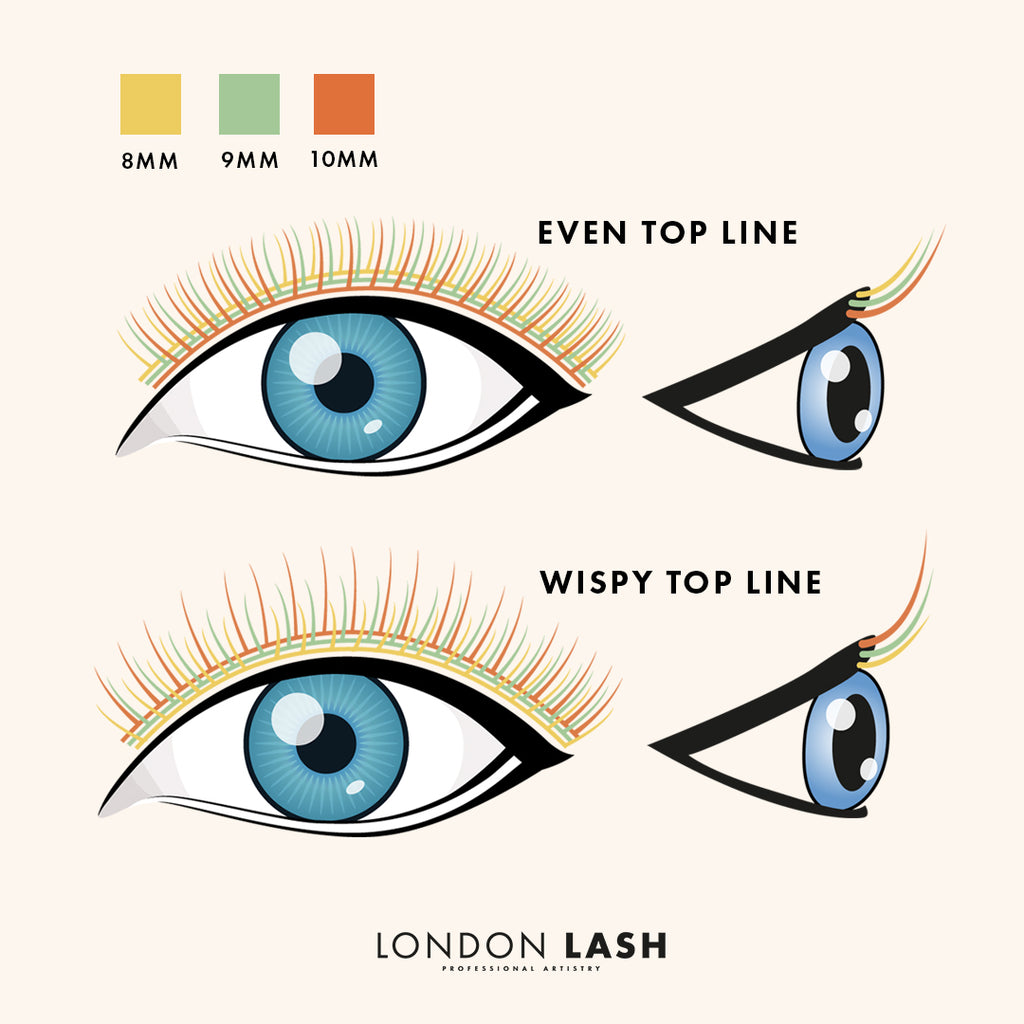
For an even wispier look, go up a length as you go up a layer. If on the bottom layer you used 9mm, use 10mm on the middle layer and 11mm on the top layer. When your client opens their eyes, they’ll have lots of density in the bottom section and a very wispy top line. This can be done with classic, hybrid and volume lashes, so play around with lash application and see what kinds of effects you can get!
All in all, though there are some rules for mapping, you can still feel free to unleash your creativity – mix curls, colors and length application to give each and every client a completely individual lash look that really complements them and keeps them coming back for more!


