


Manga Lashes Tutorial: How to Create Your Clients’ New Fave Style!
Everything You Need to Know About Manga Lashes | A Guide to Manga Lash Extensions Mapping & Application
While natural lash looks seem to be having their moment in the world of lash extensions, a new challenger has stepped forward and appears ready to take the crown. Introducing Manga Lashes: your new favourite spiky eyelash extensions look!
What Are Manga Lashes?
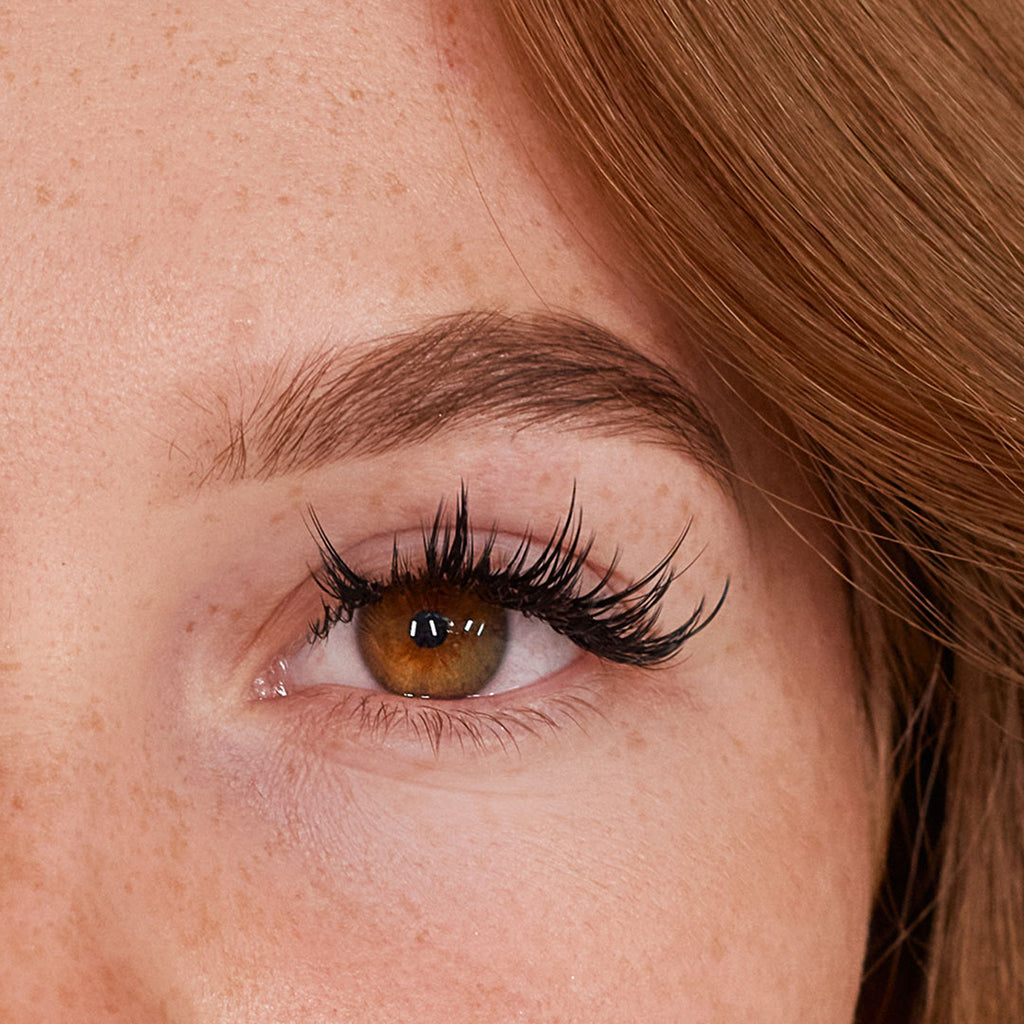
Manga Lashes are designed to give your clients lashes that look like they’ve just stepped out of an episode of an anime series. They follow a kind of animation approach where lashes would be drawn long and spread out to give the eyes an open and natural look.
If your client is attending Comic Conventions, this lash set is going to put a smile on their face – it’s bold, eye-catching, and probably the spikiest lash style going. Not to mention, your gorgeous client will look just like their favourite anime character!
Before we talk about mapping, let’s think about what result we’re actually trying to achieve. Like a lot of animated characters, Manga characters' eyes are drawn to appear big and expressive with lashes that are long and often quite well spaced out to maintain the doe-eyed kind of look that we’re used to seeing on such characters.
How to do Manga Lashes
Manga Lashes are another variation of the Wet Look – sort of. Truth be told, there are a few different ways that you can map and apply a Manga Lash map, depending on how spiky a finish you’re looking for.
Similar to a Wet Look, the key to a Manga Lash set is closed fans, however, you’ll be mixing in some regular volume fans as well. As the closed fans are going to be the main feature of the set, the regular volume fans will help them to not blend in with other closed fans - we want those spikes to really pop.
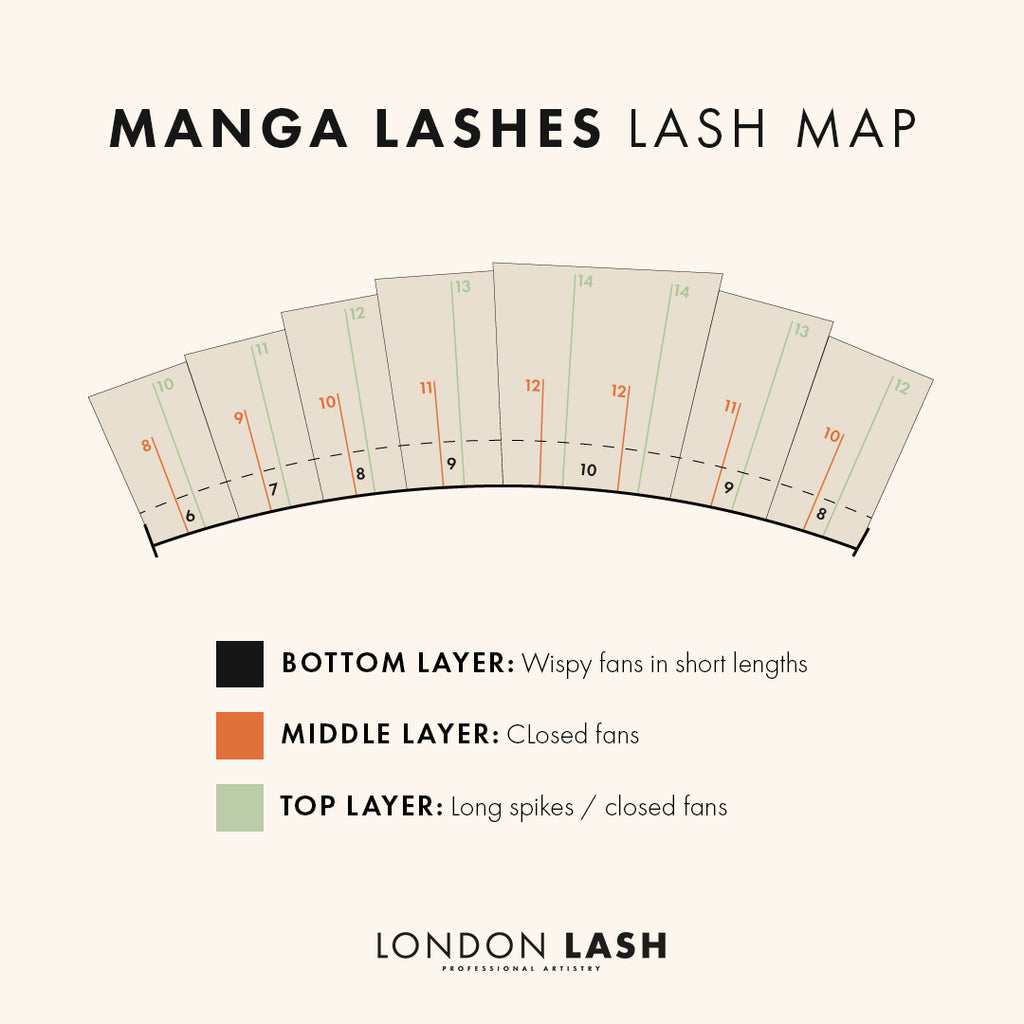
The first thing you’ll need to do, as with any style, is map out the shape you’re going for – typically, Anime characters will have big, round doe eyes so a Dolly or a Squirrel will work well for that eye-opening effect, but still keep in mind that your end goal is always to complement your client’s eye shape.

An example of a wispier set of Manga Lashes created by Iryna Prylypko for model and InLei® UK Brand Manager Gem Marin
Once you have the basic style down, mark where you’ll be adding your spikes – on the map we’ve provided below, you’ll see we’ve added two different lengths for the spikes to give a more wispy finish, and on the shorter lengths we’re using smaller closed fans just to add a bit of texture. It’s up to you if you do this and will depend as well on what your client would like. We’ve also kept the spikes to a minimum, with one spike or each length per segment of our lash map. This is to keep the lashes looking as similar to that art style as possible. You can, if you prefer, add spikes a little more randomly through the lash set if you would rather have a less ‘perfect’ end result.
Lastly, we’ve filled in the space in between the spikes with shorter fans just to give that nice dark lash line that’s typical of the art style you see in Anime eyes – you can use regular fans here, or if you wanted to add a bit more texture, try easy fanning lashes which have a mixture of lengths on each strip and naturally create a lot of density and wispiness as a result.
Manga Lashes Using Classic Eyelash Extensions
We’ve talked about closed fans and volume lashes a lot in this guide, so can you use classic lashes for a Manga Lash set? Of course! Apply the majority of lashes as normal according to your lash map, and then for the spikes you can play around with thicknesses, following the same rule of thumb as you would with volume lashes – longer spikes = thicker lashes, shorter spikes = finer lashes.
If you were using flat lashes for example, you might choose 0.25 flat lashes for the longer spikes, and 0.15 flat lashes for the shorter spikes. It’s up to you exactly which lashes you pick based on what it is your client wants their lashes to look like at the end of treatment, and which thickness of lashes will be safe to use on your client’s natural lashes.

This incredible set of Manga Lashes was made by Lash La Vida on Instagram
Curl Selection
Like with any lash set, you’ll create the best-looking lashes when you go by what a specific client’s lashes are like – try to opt for softer curls with Manga lashes as those longer spikes will soon become annoying if they start to touch the brow bones, and if they’re too curled you won’t see all of the different textures and the little details that you’ve put in place.
If you want an extra eyeliner style flick in the outer corners, something which is often drawn onto characters from Manga, you could apply some L curl lashes or M curl lashes towards the outer corners. Be sure to mark on your lash map where this will start from, and blend them in with the rest of the lashes for the best results.
A Note on Closed Fans in Manga Lashes
One last thing to mention is that it’s quite common for Lash Artists to add a tiny little bit of clear glue to the tips of the closed fans in Manga Lashes to keep them pointed – we’d recommend that if you do this, you only do it for competition lash sets which will be removed soon after the treatment, or you keep the spikes a little shorter to ensure that any extra weight that’s added as a result of the glue doesn’t have any detrimental effect on the natural lashes. While the glue shouldn’t add too much weight due to being such a teeny tiny amount, it’s easy to accidentally overload them if you haven’t done this before.
To save you some time with this, we do stock Premade Spikes, which have pointed tips thanks to being joined at them – this makes the practice safer for you as well, as you don't have to smooth out the glue on the tips of the spikes.
Bottom Lashes
Owing again to that overstated, wide-eyed animated effect, Manga Lashes often utilise bottom lashes. You don’t have to add these, and if you haven’t ever applied bottom lashes before it’s better to not run into applying them head-first, as they have their own challenges! Very simply though, opt for shorter lashes with a softer curl – B curl or J curl are best for bottom lashes – and apply those as smaller closed fans too.
And that’s all there is to it! There’s a little more forward planning involved in a Manga Lash Extensions set than in some other trending styles, but there’s so much you can do with them creatively – play around with spike length, colour, and curl to create something truly unique to your client


