
Classic Lash Extensions: The Lowdown

Table of Contents
The Ultimate Guide to Classic Lash Extensions: Products, Application and Aftercare
Classic lash extensions are a versatile choice for clients who want to define their eyes, add length, or create a mascara-like finish without applying mascara every morning. From soft, natural sets to a more noticeable lash line, the result can be tailored to the person in your chair.
But creating a beautiful Classic set involves more than choosing a tray of lashes. The extension’s weight, length, curl, finish, and attachment all matter, alongside preparation and aftercare.
Whether you’re developing your skills or explaining the treatment to a new client, this guide covers what Classic lashes are, which products to choose, how professional application works, and how to maintain the finished set.

What Are Classic Eyelash Extensions?
Classic eyelash extensions use a one-to-one application method: one extension is attached to one isolated natural lash. This adds definition and length while working with the client’s existing lash pattern.
Unlike Volume lashes, which use fans made from multiple finer extensions, Classic sets use individual extensions. The finished fullness therefore depends partly on how many suitable natural lashes the client has.
Classic doesn’t describe one fixed look. Shorter lengths and softer curls can create subtle definition, while a different map, curl, or extension profile can produce a more noticeable finish.
Who Are Classic Lashes Suitable For?
Classic lashes can suit clients looking for an everyday enhancement, a mascara-like effect, or a first introduction to extensions. They can also work well for clients whose natural lash line already has enough density to achieve their desired result.
However, a Classic set won’t necessarily create a dense lash line where natural lashes are sparse. If the client wants a fuller appearance, discuss whether a suitably weighted Hybrid or Volume set would better match their expectations.
Begin with a consultation and assessment of the natural lashes. The client’s preferred look matters, but it needs to be achievable with an appropriate extension weight and attachment.
Classic vs. Hybrid vs. Volume Lashes
| Lash Technique | Application Method | Typical Effect |
|---|---|---|
| Classic | One extension attached to one isolated natural lash. | Defined, separated lashes with added length and a mascara-like appearance. |
| Hybrid | A combination of Classic extensions and volume fans. | Additional texture and fullness, customized through the placement of singles and fans. |
| Volume | A suitable fan of finer extensions attached to one isolated natural lash. | A fuller appearance that can range from soft and airy to more dramatic. |
These are starting points rather than rigid style categories. For more detail, read our guides to Classic vs. Hybrid lashes and Classic vs. Volume lashes.
How to Choose Lashes for a Classic Set
1. Choose the Finish
Start by discussing the overall effect your client wants. Do they prefer softly defined lashes, a darker mascara-like finish, or something more noticeable?
Our Mayfair lashes offer a glossier appearance, while Chelsea lashes provide a softer, more matte finish. Compare the available options alongside the client’s natural lashes and reference photos.
Names such as “silk” and “faux mink” describe lash collections and finishes; check the individual product information for its material and specifications.
2. Select an Appropriate Thickness and Weight
Diameter affects the appearance and weight of an extension, but it should never be considered on its own. Length, shape, and construction also influence the load placed on the natural lash.
A diameter that works for one client may be unsuitable for another. Assess the natural lashes individually and follow your professional training and the extension manufacturer’s guidance.
| Extension Option | Possible Use in a Classic Set | What to Consider |
|---|---|---|
| 0.10mm Round Lashes | A finer, softly defined appearance. | Still assess the extension’s length and the natural lash’s ability to support it. |
| 0.12mm Round Lashes | Definition between a very fine finish and a stronger mascara-like effect. | Suitability depends on the individual natural lash and chosen length. |
| 0.15mm Round Lashes | A more noticeable Classic finish where appropriate. | Do not treat this as a default diameter for every client. |
| Flat or Ellipse Lashes | A broader-looking profile for a defined lash line. | Compare the specific product’s weight and specifications rather than assuming it matches a round lash of the same stated diameter. |
Thicker round extensions should not be a shortcut to fullness. If your client wants a stronger appearance, reassess the technique and extension profile instead of simply increasing the diameter.
3. Understand Flat Lashes vs. Round Classic Lashes
Flat or Ellipse lashes have a different cross-sectional shape from traditional round extensions. Their broader appearance can create a darker-looking lash line, while their construction may offer a lower weight than a comparable round extension.
The exact difference is product-specific. Check the manufacturer’s information rather than applying a blanket “half the weight” rule to every flat lash.

4. Choose Lengths to Suit the Natural Lashes
More length doesn’t automatically create a better result. Consider the natural lash’s length, condition, and direction, together with the extension’s weight and attachment area.
Use shorter lengths where needed, especially around delicate inner corners, and create gradual transitions between sections. Avoid treating a fixed amount of extra length as suitable for every client.
For clients who already have long lashes, adding definition or adjusting the curl may achieve their goal without adding much length at all.
5. Select the Curl
B and C curls can be useful options for a softer finish, while CC and D can create a more noticeable curve. The result depends on the direction of the natural lashes, eyelid structure, and how the extension sits after attachment.
Choose the curl with those factors in mind rather than selecting it solely because the client requests “more lift”. Our lash curl guide explains the differences between the available shapes.

Mapping a Classic Lash Set
Classic describes the application technique, while the map determines the distribution of lengths across the eye. You can use Classic extensions to create natural, squirrel, dolly, or other suitable styles.
Choose the map according to the client’s eye shape, natural lash direction, and desired effect. Decide where the longest section should sit, then taper and blend the surrounding lengths.
Our lash mapping guide provides examples to adapt to the individual client.
Choosing Glue and Tools for Classic Lashes
The best adhesive for a Classic set is one that suits your placement speed and working conditions. A glue that sets before you achieve proper attachment can create retention problems, while one that sets too slowly can make application more difficult.
Measure your room’s temperature and humidity and compare them with the adhesive’s working range. Choose from our professional lash adhesives based on those conditions and your technique, rather than simply selecting the fastest formula.
You’ll also need suitable isolation tweezers, a pickup tweezer that gives you comfortable control, appropriate lower-lash protection, and a lash mirror for checking your work.
How Are Classic Lash Extensions Applied?
Classic extension application is a professional treatment requiring appropriate training. The following overview brings together the key stages rather than replacing practical tuition.
Step 1: Consult, Assess and Plan
Confirm the desired result, assess the natural lashes, and choose suitable lengths, curls, and weights. Explain the treatment, maintenance requirements, and relevant product considerations before proceeding.
Step 2: Prepare the Lashes
Remove makeup and product residue, cleanse the lashes, and complete the appropriate preparation steps using products according to their instructions. Natural lashes should be clean and ready for attachment before application begins.
If your routine includes a retention or speed Booster, follow its specific directions. Do not assume every preparation product is intended for the natural lashes: London Lash Retention & Speed Booster is applied to extension bases on the strip, not to natural lashes or skin.
For a fuller explanation, see our lash pretreatment guide, alongside the current instructions for each product.
Step 3: Isolate Before Attaching
Isolate one suitable natural lash before attaching one Classic extension. Maintain the clearance from the eyelid taught in your professional training, and keep the adhesive and extension away from the skin.
Use a controlled amount of adhesive to achieve an appropriate attachment. Excess adhesive can make clean separation more difficult; a stringy or otherwise unsuitable glue drop should be replaced rather than worked into the set.

Step 4: Build the Set Evenly
Work across the lash line in a structured way and alternate between eyes to monitor balance as the set develops. Some technicians find it useful to place a small number of extensions across different sections before repeating the process on the other eye.
Maintain isolation throughout. Working in sections does not replace checking that neighboring lashes remain separate.
Step 5: Check Attachment, Direction and Separation
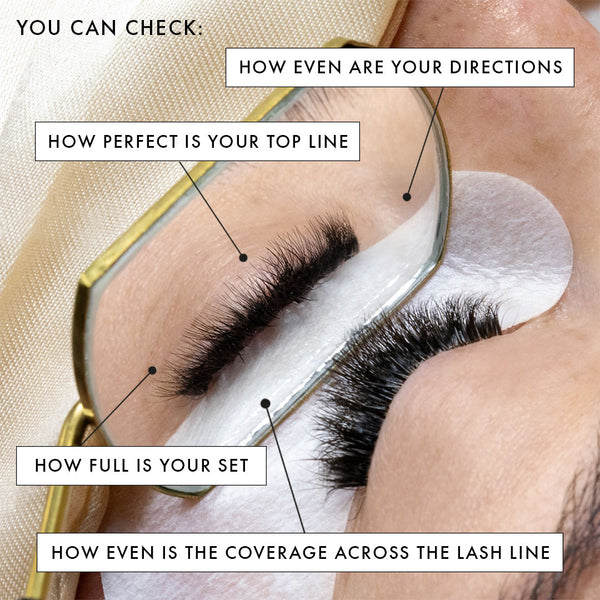
Allow enough time at the end of the appointment to check the set thoroughly. Look for lashes stuck together, unsuitable attachments, inconsistent direction, or extensions touching the skin.
Use a lash mirror to inspect the set from different angles and check the overall balance before completing the treatment. The client’s eyes should remain comfortably closed during application.
How Long Does a Classic Lash Appointment Take?
A full Classic set may take around 1.5–2.5 hours, although appointment times vary with the number of natural lashes, the planned coverage, preparation requirements, and the technician’s experience.
Give clients a realistic estimate when booking. Leave enough time for consultation, application, final checks, and aftercare advice rather than treating speed as the main measure of a successful set.
How Long Do Classic Lash Extensions Last?
Classic extensions gradually change as natural lashes grow and shed. Retention also depends on attachment, adhesive performance, product suitability, and aftercare.
Many clients return for maintenance around every 2–3 weeks, but the appropriate interval depends on the individual and the condition of their set. At the appointment, the technician assesses grown-out extensions and remaining coverage before deciding what needs replacing.
Extensions do not last indefinitely, and a fill is not simply adding more lashes over an old set. Read our lash fill versus full set guide for more detail.
Classic Lash Extension Aftercare
Give every client clear, practical aftercare instructions before they leave. A simple routine is easier to follow consistently.
- Cleanse daily: Use a cleanser suitable for eyelash extensions, following its directions, and rinse thoroughly.
- Handle gently: Avoid rubbing, picking, pulling, or tugging at the extensions.
- Brush carefully: Once dry, tidy the lashes with a clean lash brush without forcing it through tangles.
- Choose compatible products: Avoid leaving makeup or skincare residue around the lash line, and ask your technician before using mascara on the set.
- Follow your technician’s water-exposure advice: This should reflect the adhesive and finishing products used rather than a universal waiting period.
- Book maintenance: Return at the interval recommended after your set has been assessed.
Our Ultimate Guide to Lash Extensions Aftercare explains these habits in more detail.
How Much Do Classic Lash Extensions Cost?
Prices vary by location, technician experience, appointment length, and what the service includes. A full set, maintenance fill, and removal are usually priced separately, so clients should check the salon’s current service menu.
For Lash Technicians, pricing should account for treatment time, product costs, overheads, training, and the service you provide. Avoid using a single nationwide price range as a benchmark for every business.
How Are Classic Lash Extensions Removed?
Clients should arrange professional removal instead of picking, pulling, or experimenting with household products. The technician selects an appropriate removal method and follows the remover’s instructions while protecting the eye area.
Removal time varies with the adhesive, remaining extensions, and product used. If a client reports a reaction or ongoing discomfort, medical advice takes priority over attempting another treatment.
Frequently Asked Questions About Classic Lashes
Do Classic Lash Extensions Look Natural?
They can. Shorter lengths, a suitable curl, and a map that follows the natural lash line can create subtle definition. Classic sets can also look more noticeable depending on the extension profile, color, and styling.
What Thickness Is Best for Classic Lashes?
There is no single diameter that suits everyone. Options such as 0.10mm, 0.12mm, and 0.15mm create different effects, but the technician must assess the complete extension’s weight and the natural lash supporting it. Flat lash specifications should be considered separately from round lashes.
Are Flat Lashes Used for Classic Sets?
Yes. A suitable Flat or Ellipse extension can be applied using the Classic one-to-one method. Its shape can create a broader-looking finish, but suitability still depends on the particular product and natural lash.
Will Classic Extensions Fill Gaps in My Lash Line?
Classic extensions need suitable natural lashes for attachment. They can enhance the lashes present, but they cannot be attached where no natural lash exists. Your technician can discuss realistic coverage and styling options after assessing your lashes.
Do Classic Lash Extensions Damage Natural Lashes?
Damage can occur, particularly with unsuitable weight, poor isolation, incorrect attachment, or pulling during wear or removal. Careful professional application and appropriate aftercare help reduce these risks, but no treatment should be described as completely risk-free.
Can Beginners Use Fast-Drying Lash Glue for Classic Sets?
Choose the setting speed that matches your actual placement speed and measured room conditions. A faster adhesive is not automatically better. If it begins curing before attachment is complete, moving to an even faster formula may make retention worse.
Create a Classic Set That Suits Your Client
A beautiful Classic set starts with the right decisions: suitable extension weight, considered styling, careful preparation, precise isolation, and clear aftercare advice.
Explore our professional eyelash extensions to build a kit that supports a range of Classic finishes, and adapt each set to the client’s natural lashes and chosen look.
Check out these featured products
Selling Fast!


