Cat Eye Lash Mapping: The Ultimate Guide

Table of Contents
Cat Eye Lash Map: Step-by-Step Mapping Guide
A cat-eye lash map gradually increases extension lengths towards the outer area of the eye to create an elongated, sweeping effect. The final corner is tapered where needed to suit the natural lashes, rather than automatically placing the longest extensions on the outermost lashes.
Lash mapping helps us plan balanced results and provide clients with customized looks that complement their individual features. Lash mapping is essential!
Whether you’re a newcomer to the lash industry or a seasoned pro with years under your belt, chances are you’ve encountered clients eager for the Cat Style. But what is a Cat Style, and how do you craft a Cat Style lash set? Known for its alluring outward sweep, this style can create an elongated appearance and a stunning, timeless finish.
If you’re new to planning sections, curls, and lengths, start with our complete lash mapping guide, then use the steps below to explore the cat-eye shape.
Your Cat Eye Lash Map at a Glance
Use this completed map as a starting point, then follow the demonstrations below to see how the sections are constructed. Select the image to view it separately.
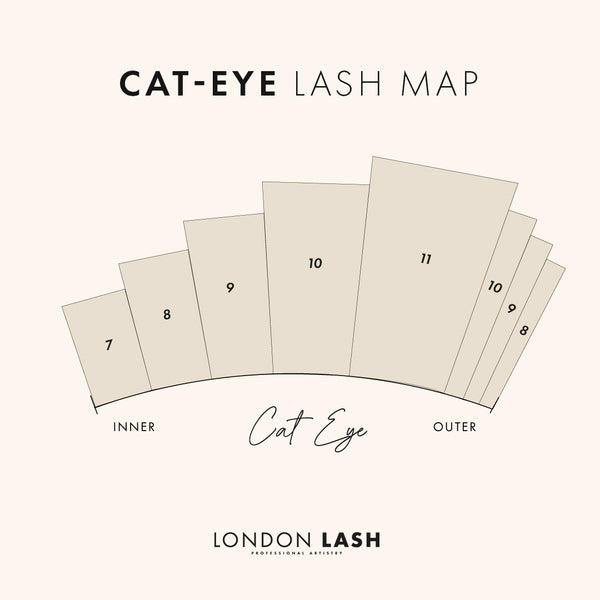
Reading the map: Follow the lash line from the inner corner towards the outer corner. The emphasis builds towards the outer section, with the final taper helping you adapt the finish to the corner lashes. Any illustrated lengths are examples, not a prescription for every client.
| Area | Role in the map | What to assess |
|---|---|---|
| Inner corner | Creates a shorter, delicate starting point. | Suitable lengths and attachment fit for the finer corner lashes. |
| Middle section | Builds gradually towards the outer emphasis. | Smooth transitions without an abrupt jump in length. |
| Outer peak | Provides the main elongating effect. | Peak position, natural lash direction, and suitable extension load. |
| Final outer corner | Tapers the design where needed. | Whether the outermost lashes can support the planned extensions. |
How to Map a Cat Eye Lash Set
1. Assess Both Eyes and the Natural Lashes
Before marking the map, assess your client with their eyes open. Look at eye shape, lid and brow position, natural lash direction, and any differences between the two eyes. Agree on how subtle or pronounced your client wants the outward sweep to be.
Choose the maximum lengths and extension load according to the natural lashes rather than copying the diagram unchanged. The aim is a balanced finished look, which may require small differences between the maps for each eye.
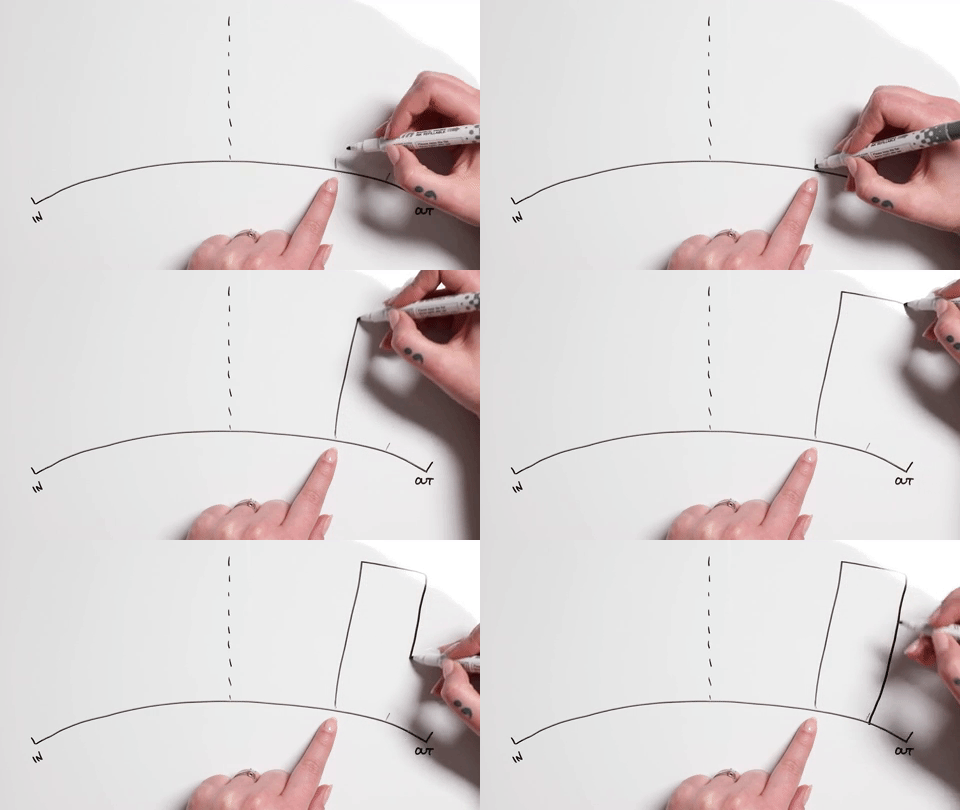
2. Mark the Center of the Eye
Start by identifying the eye’s center as a reference point. Once the eyepatches are correctly positioned, transfer your planned reference points without pressing on the eye area.

3. Divide the Outer Section
In this example, divide the outer section into two, then halve the outer portion once more. This helps you plan the area where the length builds towards its peak.
The longest section sits towards the outside of the map, but it should not automatically include the very last natural lashes. Leave room to plan a suitable final taper.
4. Plan the Final Outer-Corner Taper
Now divide the final outer-corner area into three smaller sections, as shown in the demonstration. Use these sections to plan a gradual reduction where appropriate for the natural lashes.
Despite aiming for a dramatic flick, it’s crucial to assess the lashes in this area. Excessive length or load can create an unbalanced finish and place unnecessary strain on the supporting natural lashes. If you want to learn more about assessing lash condition, check out our guide to identifying damaged lashes.
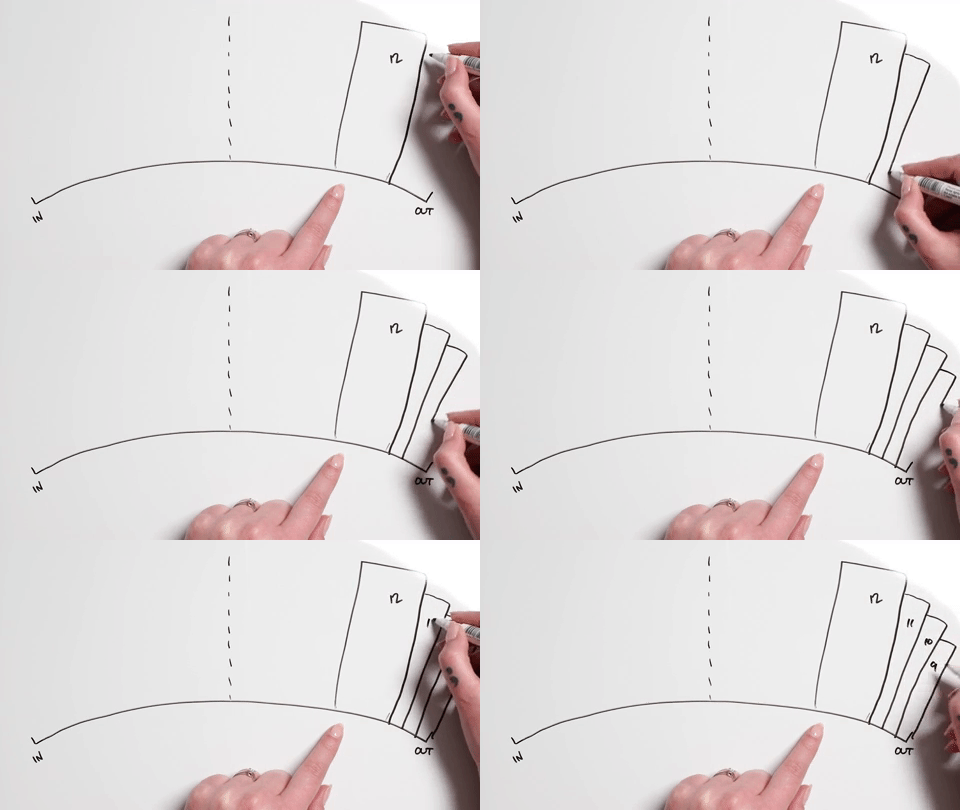
5. Complete the Inner Sections and Length Transitions
In this example, the sections near the inner corner are broader than those at the outer edge. This creates a more gradual build through the inner and middle areas, with more detailed transitions towards the outer sweep.
Write the selected lengths into each section and note any curl changes. Keep the inner corners delicate, and check that the transitions suit the client’s natural lash coverage and desired finish.

6. Review the Design and Record the Finished Map
Compare both eyes before application and adapt the plan where needed. During the treatment, check your placement and transitions rather than forcing every natural lash to follow a fixed length sequence.
Record the final lengths, curls, and any styling adjustments on the client record so you can maintain the design during future fill appointments.
Who Does a Cat Eye Lash Set Suit?
While many clients request a Cat Style, the same version won’t suit everyone’s features or preferences. Its outward emphasis can be useful for clients who want an elongated appearance, including some who would like to balance closer-set eyes.
Eye spacing alone shouldn’t determine the map. Consider the natural lash direction, outer corners, eyelid clearance, and the finish the client wants. Almond-shaped eyes may lend themselves to an outward sweep, but the design still needs an individual assessment.
If the planned cat-eye effect creates too much outer emphasis, adjust the peak and taper or discuss a Squirrel Style, which places the longest section before the outer corner.
For clients whose lashes naturally grow straight or downward, all is not lost! M curl or L curl may offer useful styling options where their profiles suit the natural lashes. Check attachment fit and eyelid clearance carefully—a different curl does not make an unsuitable length or extension load appropriate.
When to Adapt Your Cat Eye Lash Map
- Finer outer lashes: Reduce the planned length or load and move the emphasis inward if needed.
- Downward-growing corners: Assess whether the intended curl and placement create the desired direction without relying on extra length.
- Different eye shapes or lash directions: Adjust each map to create visual balance rather than insisting on identical measurements.
- A softer requested finish: Use less contrast between sections and a more subtle outer emphasis.
Troubleshooting Cat Eye Lash Mapping
| Concern | What to review |
|---|---|
| The outer corner looks droopy | Check whether the peak extends too far outward, the final lashes are too long, or the curl and placement are unsuitable. |
| The longest section looks disconnected | Review the length transitions, section widths, and changes in curl. |
| The eyes look unbalanced | Compare natural lash direction, eye shape, peak position, and visible tip lines. |
| The result is stronger than the client wanted | Revisit the reference photos and consider shorter lengths or less contrast between sections. |
A Kim K Variation of a Cat Eye Lash Set
Once you’ve planned the overall cat-eye shape, you can introduce texture through carefully positioned spikes. Keep the map shape and the top-line effect as separate decisions: the map creates the sweep, while the spikes add contrast.
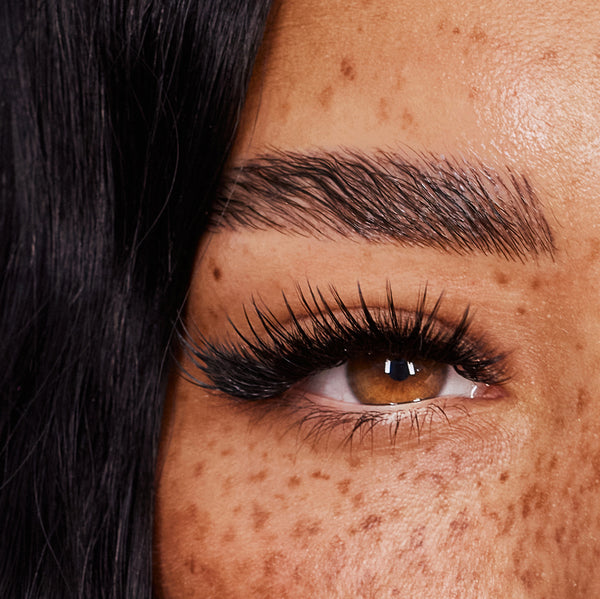
Kim K variation of a Cat Eye lash set.
Frequently Asked Questions About Cat Eye Lash Maps
Where Should the Longest Lashes Go in a Cat Eye Map?
The longest section usually sits towards the outer area, before a suitable final-corner taper. Its exact position depends on the individual eye and natural lashes rather than a fixed point that applies to everyone.
Can You Use a Cat Eye Map for Classic Lashes?
Yes. Cat-eye describes the map shape, while Classic describes the application technique. You can adapt the shape for Classic, Hybrid, or Volume sets, selecting appropriate extensions for the supporting natural lashes.
How Does a Cat Eye Map Differ From a Squirrel Map?
A cat-eye map places more emphasis towards the outer area. A Squirrel map generally brings the peak further inward before tapering down. The precise placement should be adapted to the client rather than chosen solely from the style name.
Which Curl Should You Use for Cat Eye Lashes?
There isn’t one required curl. Assess the natural lash direction, attachment fit, eyelid clearance, and desired finish. Curls can also be blended where suitable to create a controlled transition through the map.
Can Cat Eye Lashes Look Natural?
Absolutely! Shorter lengths, gentle transitions, and a subtle outward emphasis can create a softer version. The final appearance also depends on curl, diameter, color, and density.
Explore Other Lash Mapping Styles
- Dolly Style Mapping.
- Squirrel Style Mapping.
- Other Variations of the Cat Eye.
- The Complete Lash Mapping Guide.
We hope this guide has equipped you with the knowledge to plan a Cat Style lash map with confidence. Adapt the sections to the client in your chair, keep the natural lashes at the heart of your choices, and create a finish they’ll be excited to show off!
Check out these featured products



Selling Fast!