


The Ultimate Guide to Lash Extension Removal
How to Take Off Eyelash Extensions Without Damage, and Other Lash Removal Tips
As a Lash Technician, understanding the proper techniques and products to use for lash removal is crucial so that you can ensure the safety and satisfaction of your clients. If you’re not super sure how to remove lash extensions or if you need a refresher, you’ve come to the right place! Statistically speaking (based on our own experiences, at least) for every 20 sets of lashes you complete, you’ll have one removal, so it can get to a point where you haven’t removed a set of lashes in months, and would appreciate some pointers. Luckily for you, we’re right here to lend you a helping hand! Without further ado, here’s what you’ll need for a lash removal, and how to remove lash extensions easily, and without causing damage.
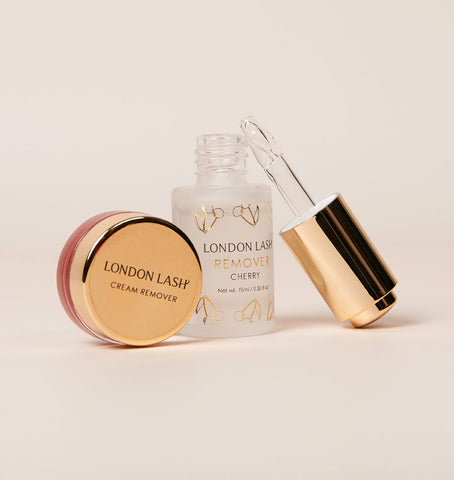
Lash Extension Remover
We’re not being dramatic when we say this – it’s vital that you use a proper lash extension remover to remove eyelash extensions. Unfortunately (mostly for people’s lashes), you can’t use olive oil to take off eyelash extensions. While we advise against using oily products on and around eyelash extensions, it’s not because oil breaks down glue, it’s because it can come between the glue bond and the natural lash, causing the extensions to slide off. If your clients try to use olive oil to take off eyelash extensions, all they’re going to end up with is well moisturized eyes and worse retention later down the line.
There are two types of lash remover on the London Lash store, and unlike the vast majority of lash extensions supplies, which you use is based on the situation and your level of experience, not on your personal preference.
It should go without saying that whichever lash extension remover you use, it’s strictly for professional use and will lead to discomfort at best if used by someone who doesn’t have the skills or know-how to use it safely. It's essential to emphasize that clients should never attempt to remove their extensions at home using this (or any) product, and if you’re considering removing your own lashes as a Lash Tech, we strongly advise that you reconsider and ask a fellow Tech to remove them for you! It’s simply not safe to be used in that way.
Cream Remover
The first type of lash extension remover is Cream Remover. Cream remover can be used by lash technicians of any level and on any client, no matter the reason they’re having their lashes removed in the first place.
The reason we recommend Cream Remover is because it’s much more user friendly, and in some situations (for example if your client has had an allergic reaction, or if they have flickery eyes) more client friendly too.
Due to the thick, creamy consistency, there is no risk of the remover running into the client’s eyes, so you can apply it and then let it get to work without worrying about the dreaded ‘umm, that burns!’
In addition to this, Cream Remover is bright pink which is (slightly) less about form as it is about function – when something is bright pink against lashes and eyepatches, it’s easy to see, which means it’s much easier to clean up when all of the lashes have been removed.
Gel Remover
Gel Remover is a lot faster than Cream Remover, which is an obvious benefit but does come with its fair share of warnings, especially if you’ve not been lashing for very long, or if you haven’t done many lash removals just yet.
As it’s naturally thinner than Cream Remover, it’s naturally runnier too. Assuming your room isn’t on the warmer side and your client isn’t too hot, the gel remover will stay where you put it, and will remove the lashes nice and fast. Any increase in temperature can mean that your gel remover is runnier than normal though, which means that it has a chance of running into the eyes, which is definitely not something you want to happen.
Gel Remover is also clear, which can make it trickier to use if you’re not too well versed in lash extension removal, simply because it’s easier to leave some of it behind when you think you’re done.
How to Remove Lash Extensions
Start as though you’re applying new lashes – while it’s not imperative that the lashes are as clean during lash removal as they are during lash application, it will help the eyepatches to stay in place, and it makes it easier to see where the remover has been applied if there is no makeup residue there.
Take some remover and put it on your eyepatch packet for easy access – not only does this save you on clean-up time, but it’s more hygienic than double-dipping your swabs. Plus, who doesn’t love getting more use out of something that would otherwise be trash? If you're using tape in place of eyepatches, put your remover on a jade stone instead, and then just wipe away whatever is left on the stone when you're finished.

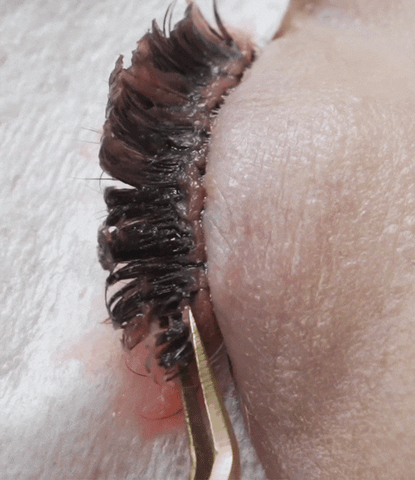
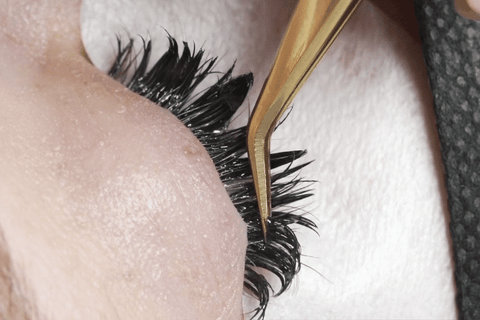
Take a microfiber brush and apply your remover to the glue bonds, avoiding the skin. If you’re using Cream Remover, it’s easier to use a brush in each hand to get the cream where you want it, and for application that’s accurate while still being fast, try using microfiber brushes with bendable tips.
Now all you have to do is wait. Generally speaking, lash removal takes anywhere from 10 minutes to 45, depending on the amount of glue, how many lashes are there to remove, and how fresh the glue on the lashes is. If the set is still quite new, you might need to take a little bit longer to remove the lashes, as newer glue is very sturdy and will not give up without a fight! In this case, it’s worth booking your client in for a bit longer than you typically would and removing the lashes layer by layer. This might seem like a longer task, but trust us when we say it’s far less stress-inducing than applying the remover as you usually would and hoping for the best!
After 10 minutes or so, take a pair of tweezers and gently try to slide the lashes off. If they’re not budging yet, give them a bit longer, otherwise just enjoy the process – for something we don’t get to do very often, it’s one of the most satisfying parts of being a Lash Tech.
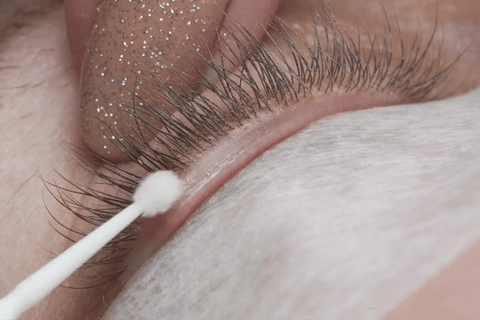
Once all of the lashes have been removed, continue to use your tweezers and microfiber brushes to remove what’s left of the glue residue and remover residue, then take some protein remover and cleansing wipes and give the lashes a deep and thorough clean, making sure to get in amongst the lashes at their roots to remove everything and anything that’s been leftover there. It’s up to you if you finish up with lash shampoo – it can be a nice way to finish for your clients, but the protein pads are sufficient for cleansing. For closer results, press a microfiber brush into the tops of your Protein Remover and Cleansing Pads and use them to get the closest cleanse of the lash line ever!
BY THE WAY: did you know that the most common cause of shock polymerization is that glue residue isn’t completely removed during lash removal? If this occurs, all you need to do is apply a little more remover to the affected area, leave it for a couple of minutes, and then scrape the residue off using your tweezers before cleaning up the lashes again, and sending your clients on their way.
We don’t think about it much, but safe eyelash extension removal is just as important as safe lash extension application. It absolutely must be carried out by someone who knows exactly how to use the products properly, and who is well aware of the risks involved when Lash Remover gets into the wrong hands. Remember, if something is labeled ‘professional use only’, it’s labeled that way for a good reason!
Check out these featured products


